PyInstaller Instructions
Time 🕐
Estimated time of completion: 30min to 1h
This is the PyInstaller tutorial for Kivy. You will learn how to use PyInstaller, what the .spec file for PyInstaller does, and how to package an exe with/without a kv file and as well as make a singular exe file or a folder with an executable inside it. Let's get started!
Reference on Kivy.org: Create a package for Windows
Requirements:
Poetry and Pyenv must be installed for this tutorial. Refer to Installation page for your OS if you do not have these installed.
VS Code is recommended, but not required.
Step 1: Have a working Kivy app to package
Step 1: Have a working Kivy app to package
For this example, we will use this basic Kivy app that works on Python 3.9.5
git clone https://github.com/ShootingStarDragon/Kivy-3.9.5
poetry env use "location of python 3.9.5"
poetry install
Using Pyenv to install and set Python 3.9.5 as Poetry environment
It is much easier to use Pyenv to install and manage multiple Python versions. Here's how:
In your cmd prompt (press CTRL+J in VS Code), type:
pyenv install 3.9.5
pyenv shell 3.9.5
pyenv which python
poetry env use "location of python 3.9.5". You might need to surround the location of your Python in quotes in case you get the "too many arguments" error in cmd.
If all else fails, you can set the Python version in the pyproject.toml file under [tool.poetry.dependencies] to whatever you like, for example: python = "^3.7"
Step 2: Install PyInstaller with Poetry
Step 2: Install PyInstaller with Poetry
Now you need to add PyInstaller to your virtual environment. Type:
poetry add PyInstaller
Poetry made it easy. Instead of pip install, hoping you get the right version working, and making sure it's installed to the virtual environment, you just do poetry add package.
Now it's time to build the app!
Poetry is saying incompatible Python version!
Poetry might complain about your Python version. The fix is to make the Python versions match correctly in the pyproject.toml using simple math. If dependencies are asking for incompatible Python versions, it is a dependency problem and not a Poetry problem. You will get the same problem with pip.
EXAMPLE: Poetry says that the dependency asks for Python >=3.10, <3.13, and your Python version in pyproject.toml needs ^3.10.
You can specify python=3.10.9. Since 3.10.9 >= 3.10, and 3.10.9 < 3.13, Poetry will add PyInstaller correctly.
Step 3: Choose between one file or one directory
Step 3: Choose between one file or one directory
In PyInstaller, you have two choices for packaging, a --onefile which makes a single executable, or a single directory with many .dlls and one .exe file. This tutorial for Kivy will cover both options.
First, enter your virtual environment in your terminal:
poetry shell
.spec file so that Kivy is packaged correctly.
Inside your virtual environment:
python -m PyInstaller --onefile --name HelloWorld main.py
This command will run PyInstaller, create a .spec file, and create a preliminary .exe build.
Example from the Kivy.org tutorial:
python -m PyInstaller --onefile --name touchtracer examples-path\demo\touchtracer\main.py
PyInstaller might take a while since it's looking for all the dependencies.
First, enter your virtual environment in your terminal:
poetry shell
.spec file so that Kivy is packaged correctly.
Inside your virtual environment:
python -m PyInstaller --name HelloWorld main.py
Example from the Kivy.org tutorial:
python -m PyInstaller --name touchtracer examples-path\demo\touchtracer\main.py
PyInstaller might take a while since it's looking for all the dependencies.
Do not rerun this command!
Do not rerun this command:
python -m PyInstaller --name HelloWorld main.py
.spec file as well as create a preliminary exe.
However, if you rerun the command after modifying the .spec file, it will REMOVE YOUR CHANGES and create a fresh .spec file!
Use Step 5's command instead to use the modified .spec file:
python -m PyInstaller HelloWorld.spec --clean
Step 4.a: Fix the .spec file that is created
Step 4.a: Fix the .spec file that is created
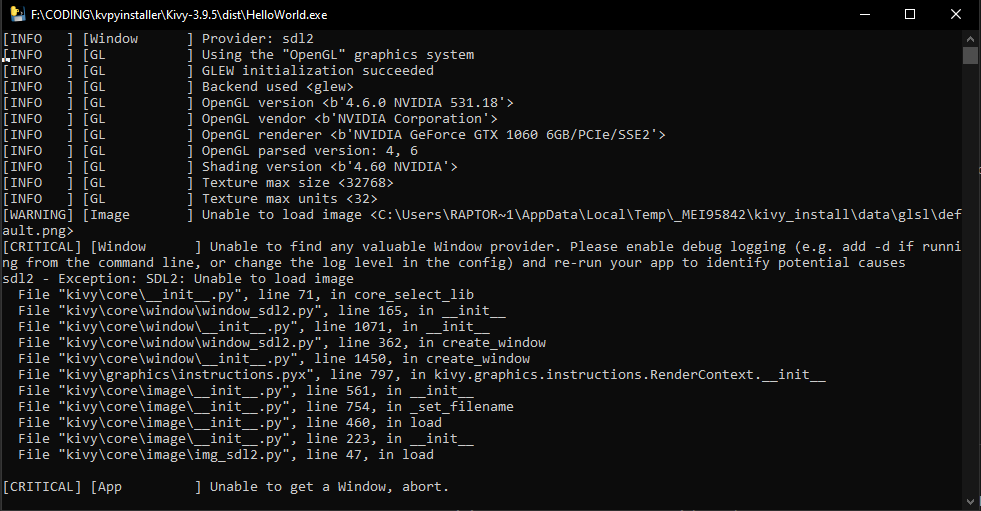
After running the initial PyInstaller command, you will find a .spec file created in the directory you ran the code, usually the top level of the Kivy-3.9.5 folder. If you run the executable in the dist folder that is created with python -m PyInstaller HelloWorld.spec, your Kivy app WILL NOT run. That is because you need the Window providers sdl2 and glew packaged alongside your Kivy app.
Why you need to modify the spec file
To add sdl2 and glew to PyInstaller, you need to add to the top of the .spec file as line 2, under # -*- mode: python ; coding: utf-8 -*-:
from kivy_deps import sdl2, glew
Scroll down and after a.datas, within the exe = EXE( arguments, replace the [], line with:
*[Tree(p) for p in (sdl2.dep_bins + glew.dep_bins)],
Sample .spec file for onefile option for example Kivy 3.9.5 app
# -*- mode: python ; coding: utf-8 -*-
from kivy_deps import sdl2, glew

block_cipher = None

a = Analysis(
    ['main.py'],
    pathex=[],
    binaries=[],
    datas=[],
    hiddenimports=[],
    hookspath=[],
    hooksconfig={},
    runtime_hooks=[],
    excludes=[],
    win_no_prefer_redirects=False,
    win_private_assemblies=False,
    cipher=block_cipher,
    noarchive=False,
)
pyz = PYZ(a.pure, a.zipped_data, cipher=block_cipher)

exe = EXE(
    pyz,
    a.scripts,
    a.binaries,
    a.zipfiles,
    a.datas,
    *[Tree(p) for p in (sdl2.dep_bins + glew.dep_bins)],
    name='HelloWorld',
    debug=False,
    bootloader_ignore_signals=False,
    strip=False,
    upx=True,
    upx_exclude=[],
    runtime_tmpdir=None,
    console=True,
    disable_windowed_traceback=False,
    argv_emulation=False,
    target_arch=None,
    codesign_identity=None,
    entitlements_file=None,
)
Scroll down and after a.datas, within the coll = COLLECT( arguments, add this line under a.datas,:
*[Tree(p) for p in (sdl2.dep_bins + glew.dep_bins)],
Sample .spec file for one folder option for example Kivy 3.9.5 app
# -*- mode: python ; coding: utf-8 -*-
from kivy_deps import sdl2, glew

block_cipher = None


a = Analysis(
    ['main.py'],
    pathex=[],
    binaries=[],
    datas=[],
    hiddenimports=[],
    hookspath=[],
    hooksconfig={},
    runtime_hooks=[],
    excludes=[],
    win_no_prefer_redirects=False,
    win_private_assemblies=False,
    cipher=block_cipher,
    noarchive=False,
)
pyz = PYZ(a.pure, a.zipped_data, cipher=block_cipher)

exe = EXE(
    pyz,
    a.scripts,
    [],
    exclude_binaries=True,
    name='HelloWorldFILE',
    debug=False,
    bootloader_ignore_signals=False,
    strip=False,
    upx=True,
    console=True,
    disable_windowed_traceback=False,
    argv_emulation=False,
    target_arch=None,
    codesign_identity=None,
    entitlements_file=None,
)
coll = COLLECT(
    exe,
    a.binaries,
    a.zipfiles,
    a.datas,
    *[Tree(p) for p in (sdl2.dep_bins + glew.dep_bins)],
    strip=False,
    upx=True,
    upx_exclude=[],
    name='HelloWorldFILE',
)
Step 4.b: Add your kv file, resources, hooks and hiddenimports.
Step 4.b: Add your kv file, resources, hooks and hiddenimports.
If your Kivy app uses external resources like kv files and images, you need to add their location to the .spec file so that they can be packaged along with the exe.
PyInstaller: Adding Data Files
PyInstaller Reference for adding files, under "Adding Files to Bundle"
To do this, you insert your file or folder location into the datas = [] line. It needs to be in the form: ("location on your PC with respect to your current working directory", "location in the packaged app").
Here is an example:
datas=[("test.kv", ".") , ("Example.txt", "."), ("Fonts\\*", "Fonts"), ("Resources\\*", "Resources")],
("test.kv", ".") means that the test.kv file will be copied to the top level of the packaged Kivy app. Similarly, Example.txt will also be available in the top level as well.
On the other hand, ("Fonts\\*", "Fonts") means that the folder Fonts, and everything in it will go to the Fonts folder in the packaged app. Similarly the Resources folder and everything inside will go to the Resources folder in the packaged app.
Sometimes you need to add hiddenimports and hooks for your app. It is unique for each dependency and that requires searching online. You can use "How to add X dependency using PyInstaller" as a starter.
Examples:
Step 5: Building a working Kivy app using PyInstaller .spec file
Step 5: Building a working Kivy app using PyInstaller .spec file
Now that the .spec file is fixed and contains all the required files and dependencies, the command to create your exe file or folder is:
python -m PyInstaller HelloWorld.spec --clean
--clean is recommended.
Step 6: Bugfixing
At this point, the example should build flawlessly, but your app may not. At this point, it is time to search for how to solve your issues.
Notes about using PyInstaller:
Notes about using PyInstaller:
console=True
- You may notice that the created package comes with a console. If you want to turn it off, change the console line in the
.specfile fromTruetoFalse.
PyInstaller onefile actually extracts to a _MEIxxxxxx folder
-
If you're using the
--onefileoption, you may notice that getcwd and your resource paths are failing. This is because PyInstaller actually extracts your exe to a_MEIxxxxxxfolder in the%AppData$/Local/Tempfolder (if you're on Windows). Here's how to get the right path: - Setting resource path to work in the exe
PyInstaller MEI folders are not always deleted! Remember to delete them if you're running out of memory space!
File opens and closes immediately after building with PyInstaller: If that is the case, you can import time, and then use time.sleep(100) after you call your Kivy app's run command. This will force the command prompt window to stay open even after the app exits, letting you see the bug without some screen record or fast printscreen fingers.
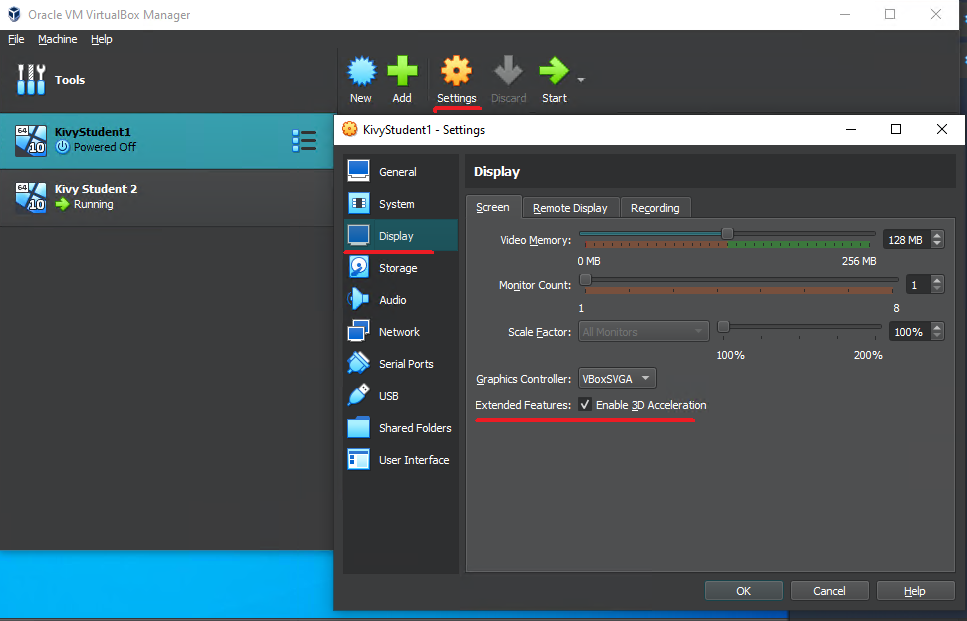
I'm using Kivy with VirtualBox and I'm getting Window errors!
- If you're using Kivy with VirtualBox, make sure 3D acceleration is enabled (Settings>Display>Enable 3D Acceleration). Then restart your VM and try again.
Enabling 3D Acceleration